Showing posts with label Christmas. Show all posts

Wednesday, December 19, 2012

A Glittery Menagerie

I wanted this year’s ornament to be something a little bit different, a bit original, something glittery…

glitter animals -  The Backyard Farmwife

I picked up a package of clothespins from the Dollar Tree, a couple of tubes of plastic animals, and grabbed the package of glitter from my stash and set to work.

First glue the animals to the clothespin with a hot glue gun…

glitter animals - The Backyard FarmwifeChoose just the right color glitter for your animals. I just had to make a golden goose…

glitter animals -  The Backyard FarmwifePaint each animal completely with white glue. It’s hard to get everything, so do it carefully…

glitter animals -  The Backyard FarmwifeSprinkle everything with glitter, covering every surface…

glitter animals -  The Backyard FarmwifeLet them dry…

glitter animals -  The Backyard FarmwifeI’m keeping the chicken for myself. :o)

glitter animals - The Backyard Farmwife

Wednesday, December 5, 2012

Mini Advent Wreath in a Pot

Sunday was the first day of Advent, the season before Christmas when we get ready for Jesus’ coming again and remember His first coming.

Every night we light a candle and read a portion of scripture. Each candle has it’s own meeting and symbolism: Hope, Peace, Joy, Love and the Christ candle.

At our Family Nite service at church, we made mini advent wreaths in mini flower pots.

advent pot - The Backyard Farmwife Buy purple (or blue), pink and white birthday candles; mini terra cotta flower pots; air dry clay; and fake greens.

First paint and/or decorate your pot however you would like. We used foam stickers and ribbon.

advent pot - The Backyard FarmwifeThen fill the pot with the air dry clay. Top with greenery.

Insert the candles into the clay. If you want to re-insert new candles in later, pull the candles out right away. After the clay dries you can take the candles in and out as you like or need.

advent pot - The Backyard Farmwife  Be sure to use your time as a family to spend time in prayer, the Word and talking about what your family is thankful for this holiday season!

advent pot - The Backyard Farmwife You can look on-line for a Bible reading schedule… I especially like this one HERE.

Sunday, December 2, 2012

Pumpkin Snowmen

What do you do with all those leftover pumpkins from your fall decorating? You know, the ones that still look pretty good but just don’t have that Christmas-y look. Don’t worry, you don’t need to toss them! Just add some with paint, a few accessories and you have an adorable winter decoration for your front porch!

I did one coat of primer and then a couple of coats of craft paint…

pumpkin snowman - The Backyard Farmwife Then glue the pumpkins together: largest on bottom and smallest on top…

pumpkin snowman - The Backyard Farmwife Then paint your faces using craft paint…

pumpkin snowman - The Backyard FarmwifeAdd accessories: scarf, hat, buttons…

pumpkin snowman - The Backyard FarmwifeThen your snowmen are ready to live outside…

pumpkin snowman - The Backyard Farmwife pumpkin snowman - The Backyard Farmwife pumpkin snowman - The Backyard Farmwife This might be the most snow we see before Christmas, so we’re gonna enjoy it! 

Wednesday, January 18, 2012

Snowflakes

Two Sundays ago, one of the girls at our Family Nite service at church showed us all how to make these beautiful snowflakes! Since we can’t always depend on the real thing here in the PNW, I made some to hang in our living room windows…

snow flake craft 03 snow flake craft 02

Apparently the outside was jealous of how wintery it looked inside… ;o)
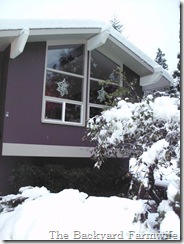
snow flake craft 01 Here are the step-by-step instructions on how to make these yourself… Sorry, some of the pictures didn’t turn out as well as I would like. But hopefully, you’ll get the picture!
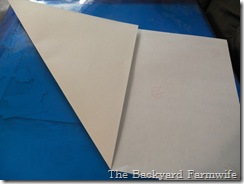
snow flake craft 041. Fold your piece of paper (don’t use heavy cardstock paper) so that you have a square. We used some old legal-sized paper. If you use an 8.5x11 piece, you’ll have less waste. Cut off the rectangle piece left over.

snow flake craft 05  2. Leave your square folded in half.

snow flake craft 063. Beginning at the fold, cut two strips on either side. Stop just before you get to the center of the triangle. Don’t let your two cuts meet. Leave about an 1/2” space in between the two cuts.
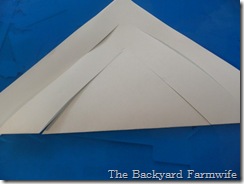
snow flake craft 07  4. Repeat one or two more times, making sure your cuts don’t meet in the center. Leave that space! The more cuts you have the lacier your snowflake becomes

snow flake craft 085. Open up the square. Bring the two loose ends together and tape into a roll. Be sure to use invisible scotch tape. You can make the roll as tight or as loose as you want. Just do each of the pieces the same way.

snow flake craft 09  .6. Turn the snowflake over.

snow flake craft 107. Bring the next two points together and tape. You can have a bit of overlap if you like.

snow flake craft 11  8. Flip it over again. Bring the last two points together and tape. Again, you can have some overlap. If you’ve done more cuts, keep flipping and taping until you are done.

snow flake craft 129. Repeat steps 1-8 six more times!

*This is where the pics start to get a bit hard to see… Sorry about the white on white!

snow flake craft 15 

10. Tape 3 of the sections together in the middle where your points joined. Make sure they are all going the same direction. Unlike in this pic… Oops! ;o)
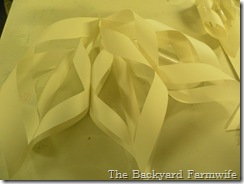
snow flake craft 16 11. Staple the top points together.

snow flake craft 1712. Repeat steps 10 & 11 for the second half.
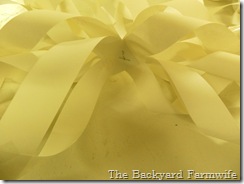
snow flake craft 1813. Staple the centers together. Then tape the two halves together where the points meet in the middle.

snow flake craft 19

I left mine just plain, but the girls at church added some sparkle to their snowflakes!

snow flake craft 20 I tried making one out of a 12x12 piece of scrapbook paper. I really like the two-tone look but think it would have been better with one more cut for a more even look.

It was also way too big to make a snowflake out of! But I think they would look lovely hanging just like that! Decorations for next Christmas???

snow flake craft 14

Monday, December 12, 2011

Santa Skirt

I actually planned to make this skirt way back in August. Plenty of time to have it ready for our big Christmas Kick-Off open house! In reality I got it done at 11:25pm the night before the shindig…

skirt 01

But I got it done all by myself, thanks to some great FB chat instructions from my sister, and it looks great as long as you don’t look too closely! ;o)

skirt 02

Don’t look too close, remember? LOL

Luckily the print is just so darn cute that no one would notice all the flaws anyhow…

skirt 03

Aren’t those Santa’s adorable???

Although the skirt was done, there was still one hitch. Nothing to wear with it! I had searched all summer and fall for the perfect red sweater to no avail. I had become so desperate I had even decided I would settle on a red turtleneck if it was the right shade of red… Nothing! In a last ditch attempt, I made a stop at the Goodwill the day before the party. They there were, TWO sweaters in just the right shade of red and in my size! And all for under $10!!!

I already have my Santa skirt schedule all figured out: next appearance, Family Christmas on Saturday!

skirt 04

In the meantime, maybe I should just leave it hanging by the wet bar in the family room??? It matches the rest of the décor perfectly! ;o)

Thursday, December 9, 2010

Christmas Crafts

I started out with such lofty ambition but then reality got a hold of me. I did not get to do all the cool crafts I wanted to, but I did the ones that were most important to me and they turned out great!

Last January, my mom and I picked up this quilt panel at the shop in Cannon Beach.

Christmas quilt 05

I didn’t get it done until guests had already arrived at our annual Christmas open house (and only because my mom helped me take out all the tags and pins) but it turned out PERFECT! Not only do I love the vintage look and the colors, and it fits perfectly in the space I had for it on the kitchen wall, but it is probably the very first quilt I have ever done that has perfectly straight lines and no puckers or ripples in it at all!!!

Christmas quilt 01Christmas quilt 02I love every one of the squares!

Christmas quilt 03  

I even had the exact match of embroidery floss for the ties!

Christmas quilt 04

I have always wanted Christmas curtains for the kitchen and this year I finally made one… The retro print is just right for the kitchen decor and I love the little additions I made to it; like a lining and the red and green borders!

apron & curtain 03apron & curtain 02I had a bit of the fabric left over so I used the rest to make myself a Christmas apron… I even added a lining to the apron and pleats! I never do pleats, but I think it added a very nice touch!!!

apron & curtain 04apron & curtain 05apron & curtain 07I like the way it looks hanging in the kitchen… It matches my carousel canisters and measuring cups perfectly!

apron & curtain 01I also decided I needed a retro kitchen towel to hang on my stove. So I traced a cute Merry Christmas in a retro font and embroidered it on an old kitchen towel I found at a second hand store.

towel 01towel 02Like every year, I made Christmas ornaments for our families. This year I used eggs… I just love our homegrown brown eggs and they made really sweet little ornaments. Just don’t drop one! You can check out how I made them at The Backyard Farmwife

egg ornaments 12