Monday, February 13, 2012

I Love Valentine’s Day

I decorated LATE this year. I mean REALLY late! But it’s up and I have some new stuff to boot!

Vintage Valentines in the kitchen…

valentine's decor 01 valentine's decor 02 valentine's decor 03

Some pretty scrapbook paper made for easy decorations in the living room…

valentine's decor 04valentine's decor 13valentine's decor 10valentine's decor 12And for my dinner bell…

valentine's decor 07I made some other miscellaneous things…

valentine's decor 06 valentine's decor 05      paper twist hearts for the windows

valentine's decor 08

valentine's decor 09felt hearts for the divider

valentine's decor 11 

some glass candy dishes

valentine's decor 14

a scrappy heart wreath for the door

valentine's decor 15

and a quilt to match

I even decided the bathroom needed something this year…

valentine's decor 16valentine's decor 17valentine's decor 18valentine's decor 19Have a Happy Valentine’s Day!  Spend it with those you love!

Thursday, February 9, 2012

Pop Open Gift Cans

I got one of those nifty safety can openers for Christmas! I have wanted one for forever, but our 20 year old model still worked and I couldn’t justify getting a new one. But someone must have taken note of my often drooling over them in the kitchen gadget section because there was one waiting for me under the Christmas tree.

It works like a dream! But the best part is that once you’ve removed the completely now harmless lid, it just pops right back on top of the can. Now I thought about it for a while and wondered how could that little feature be used to my advantage. Then I realized what it was… Gifts!

Fun, tricky, makes people wonder how you did it kind of gifts!

gift can 09

Here’s how you do it…

First you have to buy a fancy new can opener or subtlety convince someone else to buy one for you. :o)

Then buy some canned food that has a pop-off top and a normal can bottom. Not like the bottoms of some of those new soup cans! Those don’t come off with a can opener. I find myself looking through cans of food with pop tops and buying them even if I don’t need them simply because I like the size of the can… I know. I know. ;o)

gift can 01

When it is time to eat the food from the can, open the BOTTOM of the can with your can opener.

gift can 02  Eat the food from the can!

gift can 03Then peel off the lid and wash the can and the bottom “lid”. Don’t worry, it’s not sharp! LOL

gift can 04  After the can is completely dry, cover it with whatever paper you like. This is the part where you can be as creative as you want to be!

gift can 06Now remember, your gift can has no bottom but still has that nifty pop-off top! :o)

Flip your can over and fill it with whatever you’d like. Mine is filled with some homemade candies. Yum!

Keep in mind that whatever is on the top when you fill it will be on the bottom when it is right-side up… My marshmallows are under those caramels.

gift can 07 Now pop the “lid”/bottom back onto the can. You can glue it on if you’d like but I thought it stayed on pretty well just the way it was.

gift can 08 And there you have it! The recipient will be totally baffled as to how you did it! Unless you cave in and tell them… ;o)

gift can 09

Friday, January 27, 2012

Toilet Paper Roll Art

When I painted our living room, I wanted something new for the wall. Something fun and 3-dimensional. Something simple. And, most of all, something that was really cheap or easy to make.

I found something that met all of my requirements on Pinterest! What would I do without Pinterest???

Here’s all you need to do to make your own work of art.

First collect a whole bunch of t.p. rolls. Make sure they are empty. You don’t want white bits of toilet paper hanging from your masterpiece… ;o)

Then mark each roll with a pencil every 1-inch.

tp art 04 Cut them into sections on each line.

tp art 05 Crease at each end so they have that nice petal-shape.

tp art 06Now you want to paint each one. Some crafters suggested spray painting them. Others suggested spray painting each one individually in a gloved hand to keep them from flying away while spray painting them. Some suggested spraying the entire piece when complete. A few mentioned that if you sprayed them too heavily they got too wet and icky from all the paint.

Whoa! Did painting a bunch of t.p. pieces really have to be that complicated???

I chose my own method. I set up a tv tray, lined it with a plastic garbage sack. Got some acrylic paints (I chose 3 colors instead of just one: gold, black and espresso) and painted each one by hand. First I did all the insides, then I did all the outsides. I watched Downton Abbey while I worked (if you haven’t seen it yet, you HAVE to check it out!) which made it fun and go really fast. Acrylics dry really fast and they were done before I knew it!

tp art 01tp art 07This next step also seemed very complicated…. I have no idea why??? That’s why God created glue guns.

Some used craft glue or white glue and held the pieces together with clothespins, leaving their slow-drying projects to look much like a wooden porcupine. I prefer my trusty old glue gun on low heat. Instant dry and no pins!

Begin gluing your pieces together however you choose…

I did mine in this sort of amorphous blob because I liked it the best.

tp art 03tp art 02I love the way it looks above the chair! 

But I also liked all of these shapes…

 tp art 01 fogithese squares are from Full of Great Ideas

 tp art 02 mom

  the rectangle shape from SimplyRealMoms

tp art 03 mbj

 I love this one from The Mayberry Home Journal! It reminds me of a chrysanthemum. I think it would be gorgeous done in a bright purple-y magenta color!

tp art 05 ts tp art 04 ts 

{Twenty} Something did them on canvas backgrounds for a totally different look!

Tons of great options to match all kinds of decors! So have fun, be creative and start saving those toilet paper rolls!

Wednesday, January 18, 2012

Snowflakes

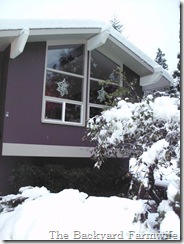
Two Sundays ago, one of the girls at our Family Nite service at church showed us all how to make these beautiful snowflakes! Since we can’t always depend on the real thing here in the PNW, I made some to hang in our living room windows…

snow flake craft 03 snow flake craft 02

Apparently the outside was jealous of how wintery it looked inside… ;o)
snow flake craft 01 Here are the step-by-step instructions on how to make these yourself… Sorry, some of the pictures didn’t turn out as well as I would like. But hopefully, you’ll get the picture!
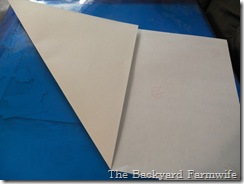
snow flake craft 041. Fold your piece of paper (don’t use heavy cardstock paper) so that you have a square. We used some old legal-sized paper. If you use an 8.5x11 piece, you’ll have less waste. Cut off the rectangle piece left over.

snow flake craft 05  2. Leave your square folded in half.

snow flake craft 063. Beginning at the fold, cut two strips on either side. Stop just before you get to the center of the triangle. Don’t let your two cuts meet. Leave about an 1/2” space in between the two cuts.
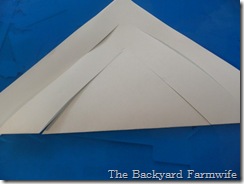
snow flake craft 07  4. Repeat one or two more times, making sure your cuts don’t meet in the center. Leave that space! The more cuts you have the lacier your snowflake becomes

snow flake craft 085. Open up the square. Bring the two loose ends together and tape into a roll. Be sure to use invisible scotch tape. You can make the roll as tight or as loose as you want. Just do each of the pieces the same way.

snow flake craft 09  .6. Turn the snowflake over.

snow flake craft 107. Bring the next two points together and tape. You can have a bit of overlap if you like.

snow flake craft 11  8. Flip it over again. Bring the last two points together and tape. Again, you can have some overlap. If you’ve done more cuts, keep flipping and taping until you are done.

snow flake craft 129. Repeat steps 1-8 six more times!

*This is where the pics start to get a bit hard to see… Sorry about the white on white!

snow flake craft 15 

10. Tape 3 of the sections together in the middle where your points joined. Make sure they are all going the same direction. Unlike in this pic… Oops! ;o)
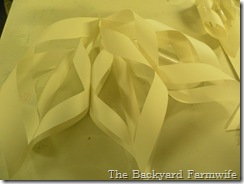
snow flake craft 16 11. Staple the top points together.

snow flake craft 1712. Repeat steps 10 & 11 for the second half.
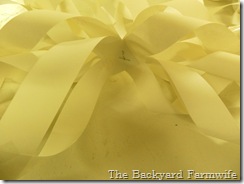
snow flake craft 1813. Staple the centers together. Then tape the two halves together where the points meet in the middle.

snow flake craft 19

I left mine just plain, but the girls at church added some sparkle to their snowflakes!

snow flake craft 20 I tried making one out of a 12x12 piece of scrapbook paper. I really like the two-tone look but think it would have been better with one more cut for a more even look.

It was also way too big to make a snowflake out of! But I think they would look lovely hanging just like that! Decorations for next Christmas???

snow flake craft 14

Saturday, December 31, 2011

New Year’s Tree

I was going through albums looking for pictures for my Family Flashback post on our family’s blog and found this…

new year tree

When we celebrated Y2K New Year for the year 2000 (after all it could have been the very last time we ever had a normal holiday again… LOL) my mom and younger sister decorated their Christmas tree with New Year’s decorations: colored balls, clocks, party hats, noisemakers… They even made a matching tree skirt out of felt!

I’ve always wanted to do this but I take down our Christmas decorations before New Year’s so that they are put away for my middle son’s birthday on the 3rd.

Maybe I’ll do it after he moves out??? ;o)

Monday, December 12, 2011

Santa Skirt

I actually planned to make this skirt way back in August. Plenty of time to have it ready for our big Christmas Kick-Off open house! In reality I got it done at 11:25pm the night before the shindig…

skirt 01

But I got it done all by myself, thanks to some great FB chat instructions from my sister, and it looks great as long as you don’t look too closely! ;o)

skirt 02

Don’t look too close, remember? LOL

Luckily the print is just so darn cute that no one would notice all the flaws anyhow…

skirt 03

Aren’t those Santa’s adorable???

Although the skirt was done, there was still one hitch. Nothing to wear with it! I had searched all summer and fall for the perfect red sweater to no avail. I had become so desperate I had even decided I would settle on a red turtleneck if it was the right shade of red… Nothing! In a last ditch attempt, I made a stop at the Goodwill the day before the party. They there were, TWO sweaters in just the right shade of red and in my size! And all for under $10!!!

I already have my Santa skirt schedule all figured out: next appearance, Family Christmas on Saturday!

skirt 04

In the meantime, maybe I should just leave it hanging by the wet bar in the family room??? It matches the rest of the décor perfectly! ;o)