Wednesday, February 16, 2011

But It Has Toadstools…

About a year ago I told myself I would not buy any more fabric until I had used up more of my stash. But they still keep making really cute fabrics and I keep going to fabric stores…

Last week I went to Joann’s to buy something I needed and had to walk by the fabrics to get to it. And right there on the corner, right where I could see it, was the cutest green toadstool-print fabric! I instantly fell in love!!!

mushroom fabric 01

I was strong and told myself (out loud) that I did not need it! Then I got what I came for and headed back to the register to pay.

But somewhere in the back of my mind I could almost hear it calling my name. My brain kept telling me that I would regret it if I didn’t buy at least a little of it… After all, it was even on sale!

So, rather than live with regret, I went back and bought some… but only a half yard!

Now, what should I make with it??? :o) I’m thinking a fun whimsical runner for the dining room table…

Monday, February 7, 2011

Candy Cane Hearts

This is a super cute Valentine’s Day project, a tasty treat and the perfect way to use up all those little candy canes you still haven’t eaten from Christmas!

All you need is:

mini candy canes

candy melts (any color you like)

sprinkles (optional)

hearts 01

First unwrap your candy canes and arrange them in heart shapes on a baking tray lined with parchment or wax paper.

Then melt the candy melts. You don’t need too many for this project, so don’t melt the whole bag unless you are making about 60 of these!

hearts 02This little bit made 8 hearts!

Pour the melted candy into a ziploc freezer bag and cut off a small bit of one corner. From this point on you must work quickly! The candy melts set up FAST!

Then use this to fill your hearts with candy melt.

hearts 03 Use a butter knife to smooth out the candy melts in your heart.

 hearts 04 Sprinkle with the decorative sugars or sprinkles of your choice.

hearts 05Let them sit until set (it doesn’t take long). I wouldn’t suggest making these up too far in advance as the candy canes seem to get a bit soft after time.

hearts 06hearts 07They turn out super cute and make a sweet surprise for your Valentines!  

Wednesday, February 2, 2011

T-Shirt Bags

This is a great idea for making bags out of t-shirts! It was a no-sew project, but I came up with a few variations of my own…

First you have to make the handles. These are the same no matter what bag you choose to make…

bag handles 01 First iron your t-shirt

bag handles 02

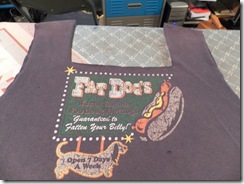
Cut off the sleeves being careful not to cut too low down the sides of the shirt.

bag handles 03

Cut the collar out. You can round the corners or square them off. (see below)
bag flat bottom 01

For a very simple, no-sew bag. Here’s what you do.

Cut a 3/4” strip from the middle of one of the sleeves you removed from the shirt. Cut off the seam to make one long string. Pull on both ends of the strip causing the edges to curl in.

bag drawstring 02Cut one small slit in the hem on the bottom of the shirt. Be careful not to cut through seam.

bag drawstring 03 

Attach a small safety pin to one end of the strip

bag drawstring 04

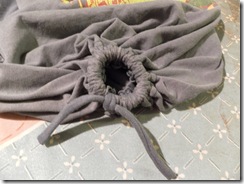
Feed the string all the way through the hem. Be sure to hold on to the loose end so that you don’t loose it inside the hem!
bag drawstring 05

Pull it tight and tie it off. The bag will have quite a large hole in the bottom. But it still works fine for carrying larger objects.

bag drawstring 06

For a very simple sewn bottom, follow these steps…

bag flat bottom 02 Turn shirt inside out and pin closed. Sew the bag shut.
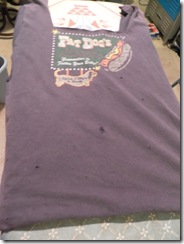
bag flat bottom 03Remove pins and turn right side out. Simple!

You can also make a bag with a flat, squared bottom. This is a little more complicated but still very easy!

bag square bottom 01Turn shirt inside out, pin and sew bottom shut.

bag square bottom 03

bag square bottom 02 

 Remove pins and pull apart bottom seam. Line up the bottom seam with the side seam. Mark the triangle about 4” from tip with a pencil. Mark closer to tip with a smaller shirt. Sew on the pencil line.

bag square bottom 04

 Repeat on the other side.

bag square bottom 05

bag square bottom 06Then I got the idea of waterproofing the inside to use for sandy beach stuff or wet swimsuits, anything you would want in a plastic bag…

bag waterproof 01Prep your shirt like for any of the other bags. A smaller shirt works better for this one.

bag waterproof 02   

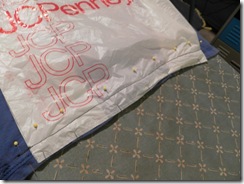
Turn shirt inside out and pin a heavier weight plastic bag on top of the shirt.
bag waterproof 03

Sew the entire bottom of the bag through all three layers. Remove pins and turn shirt right side out.

 bag waterproof 04

Line up the handles of the shirt with the plastic bag handles. Pin together and sew across shoulder seam.

bag waterproof 05

Line up the top of the bag with the inside of the handles.

bag waterproof 06

Pin up the edges and sew a 1/4” seam along the top, front and back.

bag waterproof 07

bag waterproof 08Your bag is now lined and ready to go!

I brought these bags with me on my bi-monthly shopping trip and put them to the test. They are quite stretchy but worked great! They would also work for books, craft projects or anything else that needs a bag…

This would also be a great project for those really cute shirts that have been outgrown.

Have fun and be creative!

Friday, January 7, 2011

Camera Bag

Santa gave us a new camera for Christmas but didn’t give us a bag. It’s too nice of a camera to not have a cozy little home of its own! But I also don’t like all those store-bought camera bags, they just aren’t cute… :o)

So I went into my stash, found some fabric I liked and made my own. It’s not exactly what I wanted but it will do nicely for our trip and will also double as my purse. And I love my little bird on the flap!

camera bag 01

I think I’m going to love the long messenger-style handle

camera bag 02Side pocket for sunglasses

camera bag 03 

Back pocket for phone and any other necessities

camera bag 04 

I put a couple of pockets inside, too!

After a whole week of use I’m sure I’ll know exactly what features I’ll want for my next one! :o)

Friday, December 31, 2010

Water Bottle Holders

I wish I could think of a catchier name for these little things but alas I can’t think of one. But I’m open to suggestions…

We bought 5 of these at the Washington State Fair 5 years ago. Since then we have used them TONS! They have gone to fairs, festivals, camping, exploring, hiking… EVERYWHERE!!! Unfortunately we have lost or broke two of them and I decided it was about time to replace them.

Fortunately they are super easy to make!

Run to your local hardware store and pick up 7/8” rubber O-rings. Ours were 89 cents each.

Then cut lengths of ribbon at 34”. You can make them longer or shorter depending on what you want or who you are making them for. Make sure the ribbon is not wider than 3/4” and that is it soft but not silky.

bottle holders 01 After gathering all your supplies, attach the ring to the ribbon at both ends of the ribbon by folding it over just enough to sew on your machine. Just be sure you fold it the same direction on both sides. Secure with pins.

bottle holders 02Sew on your machine, or by hand, making sure that you go over it at least twice to be able to take the weight of the water bottle.

bottle holders 03Clip off the extra threads and put Fray-Check on the cut edges of the ribbon.

bottle holders 04Now you can just slip your water bottle onto the O-ring and take your water wherever you like!

bottle holders 05I made three new holders and I can’t wait to see how they hold up!

bottle holders 06

Thursday, December 9, 2010

Christmas Crafts

I started out with such lofty ambition but then reality got a hold of me. I did not get to do all the cool crafts I wanted to, but I did the ones that were most important to me and they turned out great!

Last January, my mom and I picked up this quilt panel at the shop in Cannon Beach.

Christmas quilt 05

I didn’t get it done until guests had already arrived at our annual Christmas open house (and only because my mom helped me take out all the tags and pins) but it turned out PERFECT! Not only do I love the vintage look and the colors, and it fits perfectly in the space I had for it on the kitchen wall, but it is probably the very first quilt I have ever done that has perfectly straight lines and no puckers or ripples in it at all!!!

Christmas quilt 01Christmas quilt 02I love every one of the squares!

Christmas quilt 03  

I even had the exact match of embroidery floss for the ties!

Christmas quilt 04

I have always wanted Christmas curtains for the kitchen and this year I finally made one… The retro print is just right for the kitchen decor and I love the little additions I made to it; like a lining and the red and green borders!

apron & curtain 03apron & curtain 02I had a bit of the fabric left over so I used the rest to make myself a Christmas apron… I even added a lining to the apron and pleats! I never do pleats, but I think it added a very nice touch!!!

apron & curtain 04apron & curtain 05apron & curtain 07I like the way it looks hanging in the kitchen… It matches my carousel canisters and measuring cups perfectly!

apron & curtain 01I also decided I needed a retro kitchen towel to hang on my stove. So I traced a cute Merry Christmas in a retro font and embroidered it on an old kitchen towel I found at a second hand store.

towel 01towel 02Like every year, I made Christmas ornaments for our families. This year I used eggs… I just love our homegrown brown eggs and they made really sweet little ornaments. Just don’t drop one! You can check out how I made them at The Backyard Farmwife

egg ornaments 12